So you have a Brother KH930 Knitting Machine that you have let the smoke out of, and now it wont turn on, beep, boot up, power up or respond to any hitting or cursing. As is commonly known, all electrical items actually run on smoke, once it comes out, the item will not work. 🙂 I found it was some small capacitors that released the smoke on this knitting machine.
My mother had collected this KH930 after it had stopped working, hoping I might be able to fix it. The previous owners had removed the needles for use as spares on other machines, that is why there are none in the photos. You do not have to remove the needles to perform this repair.
This fix may work for other models too, I would guess any that have the power lead that plugs directly into the side of the knitting machine. Not ones that use a “plug pack” or “power adapter”. 230/240/250v AC models should be the same components, 110v I don’t think would be the same value capacitors.
WARNING: Seek professional advice if unsure! 240v is dangerous.
Always unplug the knitting machine, or anything electrical for that matter, before opening! Switch it on and off (while unplugged) a couple of times to help discharge any electronic components that may hold a charge. Even though I had no issues with this repair, I will not be held responsible for any injuries sustained performing this repair.
Very basic soldering skills are all thats needed, and if you have never used a soldering iron before, it is quite easy to learn, just grab a cheap fine tipped soldering iron (under AU$10) and I think you will do OK! I will try to get a video online soon showing the basic skills required.
Each photo can be clicked on to enlarge, click the “BACK” button on your browser to return to the page.
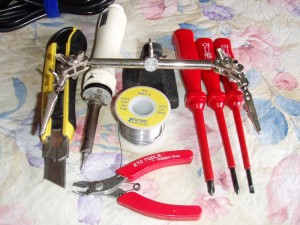 We may as well go into the tools required for this particular job.
1. A fine tipped soldering iron suitable for electronics.
2. Some suitable solder (mine says 0.71mm diameter, 60% Tin, 40% Lead).
3. A Number 2 Phillips Head Screwdriver (maybe a smaller one too depending on your machine).
4. A small flat blade screwdriver.
5. Small sidecutters
6. Very narrow blade (optional)
7. Adjustable work holder (optional)
Step 1: Disassemble the Knitting Machine.
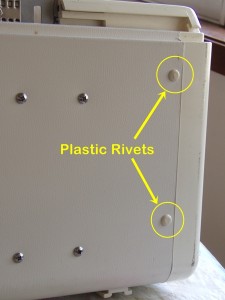
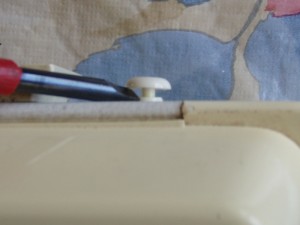 Carefully turn the machine over. At the end where the power lead plugs in you should see the 2 plastic rivets indicated. Carefully slip a fine blade under the edge and lever outward. The second shot shows how the plastic rivets work. The centre/cap slides out leaving a small hole in a smaller part of the rivet, remove the smaller part too. There is one to remove on the back of the machine also. 3 plastic rivets in total.
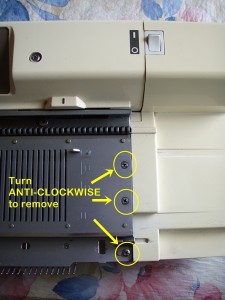 Next, flip the knitting machine back over to the correct side facing up and remove the 3 screws from the bed. Take note of which screws come from where, they are different! On the Brother KH930, the 2 in the main bed are countersunk, the one near the gate pegs is ‘pan head’.
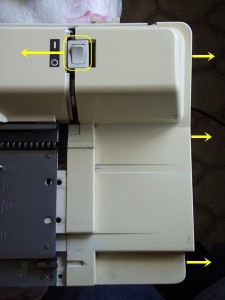 Slowly work the plastic end of the knitting machine apart from the metal bed. The power switch may want to stay behind, thats fine, it should wiggle free eventually, it is held back by the transformer inside.
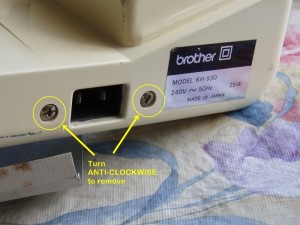 Next, remove the screws holding the power socket in place. There is actually a metal plate around the back of the socket so as you unscrew, it sort of feels like the screw is just spinning because there is no outward pressure to push the screw out. You can see inside that unscrewing is pushing the metal backing plate backwards instead. Keep going until it is free of the screws.
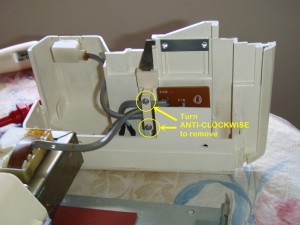 Inside where the power cables go, there is a plastic retainer with two screws holding the cables in place, remove the screws to release the retainer and allow the circuit board to slide out of its little hidey hole. Take a mental note of which way up it fits in. Set the plastic case aside.
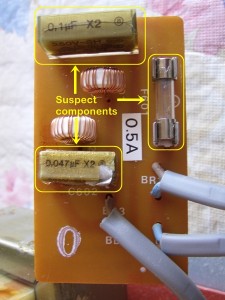 Now we can see the top of the circuit board. The fuse can be popped out (it was blown) and the capacitors were visibly damaged, one of them was split open. Luckily the details of the capacitors were still legible, take a photo or write down the details before touching them as they may turn to dust when touched and those seemingly random numbers and letters are very helpful! If you live near an electronics store, take the components with you once they are removed. Hopefully the sales people will know what to replace them with. The 2 capacitors and one fuse should cost you much less than AU$10. I got 5 of each for AU$15.
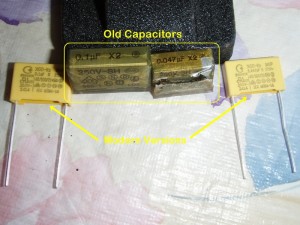 The Brother KH930 Knitting Machine I am working on used one 0.047uF 250V AC Mains, Metallised Polypropylene Capacitor, X2. One 0.1uF 250V AC Mains, Metallised Polypropylene Capacitor, X2. Oh, and one 500mA M205 Quick Blow Fuse, 5mm round x 20mm long.
The Soldering Stage
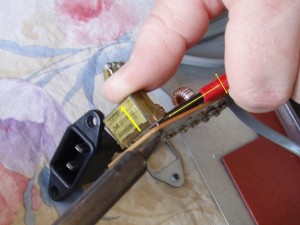 Plug in your soldering iron, the fun is about to start! Make sure it is away from anything that might melt or catch on fire, including children. As long as the tip stays up off the table by about 30mm, it should be fine. If you have a brand new soldering iron, touch some solder onto the tip until it melts and coats the tip a bit, this aids in the transfer of heat.
OK, locate the legs of the capacitors and turn the circuit board over, find the spot where each leg is soldered on the bottom. Mark with a permanent marker if you like, in case you get going and unsolder all the components 🙂
Carefully touch the tip of the iron onto the blob of solder holding one of the legs, at the same time rock the capacitor slightly back and forth with your other hand, with your third hand, try to push the flat screwdriver under the capacitor without scratching the circuit board! This is where I decided to use the adjustable job holder thingo. It can also be done without the screwdriver, but it does make it easier. With some careful levering, not scratching the board, the combination of rocking the capacitor and lightly pushing with the soldering iron, the offending leg should eventually pop free out the side where the capacitor is. Repeat for the other 3 legs.
Try not to overheat the board, the solder just has to be soft/liquified, not boiling.
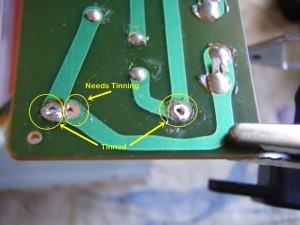 If you have loads of solder on the iron tip, wiping quickly on a piece of paper or slightly damp sponge will remove it. You do want a thin coating of solder on the iron as this transfers heat better to the solder job.
The new capacitors I bought were slightly smaller width ways than the original, but there were extra holes on the circuit board for smaller caps! Fresh solder jobs require “tinning”, this means applying a thin layer of solder onto each surface for ease of joining when the time comes. As you can see, the closer hole is copper coloured eg. no solder on it. Using the soldering iron tip, heat the copper surface and slowly feed the solder wire onto the copper, not the iron. The surface should get hot enough to melt the solder. By heating the job to melt the solder you ensure the solder is making excellent contact with the surface, otherwise the might be floating on the “flux”, the liquid brown stuff that creates the smoke 🙂 (There is a more technical explaination…)
We also want to make sure the holes are free from solder, just use the tip of the iron and lightly sweep across the holes, removing excess solder from the iron each time, until the hole opens. You do not have to scratch away at the solder with the iron, it will just wipe away when hot, with the iron, don’t touch it with your fingers!
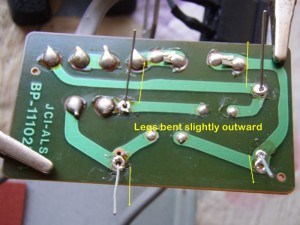 Insert your new capacitors into the relevant locations (the 0.047uF into C602, 0.1uF into the top spot).
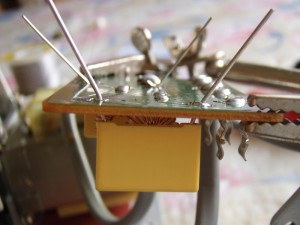 Bending the legs outward slightly holds them in position for soldering, do not cut the legs shorter just yet.
 Solder the legs in place by heating the leg, down near the joint, with the tip of the iron. The capacitors I got were pre-tinned, so I required very little extra solder to make the join.
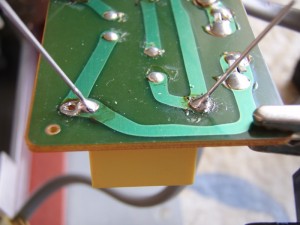 You may have to feed a little of the solder along the leg (while the iron is making the leg hot) so it creates a small mound up the leg. A good solder joint is pointy like a volcano rather than rounded like half a ball.
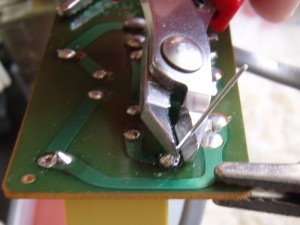 Give your freshly soldered legs 10 to 30 seconds to cool, then trim them off with some sidecutters. The less sharp leg sticking out, the better, although its not critical.
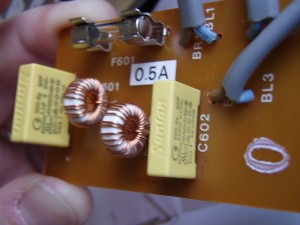 Thats it! Snap your new fuse in and you are finished! Easy! You can now do the reverse of the Disassemble a Knitting Machine to put it back together. I like to test things before they go back together, but if you accidently touch something while the power is plugged in you could be in for a nasty shock, or your family will be… Put it back together first!
I don’t believe it, I fixed a knitting machine!
Once everything is screwed together and plastic rivets are pressed back in, plug it in and turn it on! If more smoke comes out, or it still doesn’t work, start from the top and see if the fuse is blown, there may be something more serious wrong with your knitting machine… sorry about that!
Please feel free to leave a comment or ask a question about the above procedure! Thanks for reading!

You saved me a fortune giving this free well detailed fix it with photos, I bought my mum a Brother KH910 plugged it in then puff burning and went off, I was so glad to find your help, I just ordered everything you suggested and then opened it up as going of the plastic burning smell I just gathered not being used for some years I had the same problem, today my fused arrived I got to work on it and hey presto it works. Your a wonderfully person taking the time when you did this post, laddies you can do anything if you try it everything always looks daunting until you have a go, I’m 50 good at many things but still need information like doing new recipes. Now mum can get going on her machine :0)
Hi,
My 910 went, so I bought another one, and that went immediately too. Thank you so much for this, including the fact that it wasn’t (entirely) my fault. Yet to do it, but I have one to practice on!
B
If we could take everyone’s input here; and work to create a better way of life for the world; what we could accomplish without a government stepping in to tell us how they want us too live. Everyone of YOU!, having a problem to address, and a very pleasant guid, willing too show us the way, how could we fail? I have a KH 910 Brother Knitting Machine given too me, by a Americans co-worker; who’s Mother had left behind. He didn’t know how to give it to to use accordingly. Till he met me and seen what I like to do in the way of crafts. He tested me to see if I could even get it running. I did! And had to make a Harle Davidson colored scarf to wear when on his motorcycle. All of YOU; make such an astonishing experience happen. Wow! If one could bottle it, what a killing! ,YOU could make. Helping one another is awesome. ENERGY!!
Thank you so much for these instructions. I was given a Brother 910 and first time i used it it went up in smoke. I have now replaced the capacitors and the fuses which i would not have thought to do before finding your website. The machine works well now and is saved from the scrap heap. All i ave to do now is work out how to use the patterning. Many thanks from down under.
Thanks so much for this article. The second-hand 950i that I purchased off eBay went pop bin a billow of smoke on the night before Christmas Eve… first time I had it switched on since I got it home the week before!
I read your article and then found a repair “kit” on eBay. It was delivered really quickly after Christmas.
Thanks to you and your wonderful article I had the confidence to open my 950i up and replace the popped and leaking capacitors.
My machine is now powering on again with no lasting signs of anything having ever gone wrong :o)
where can I buy the parts capacitor and fuse
Admin,
Thank you so very much. I can’t believe you took the time to post all of this. And the comments are all very encouraging and informative also. I am afraid this is beyond me and my husband isn’t to sure about it. I have a son-in-law who is very much into computers and has even build some. Its the knitting machine don”t know what his thoughts will be. I have really missed my machine. I sold my old Studio. tempted to see if she is using it and maybe buy it back. I bought this machine for the G carriage and that I really, really hate to give it up. My son-in-law who will be here in a couple of weeks. I am hoping when I show this to him he will be interested enough to look into it for me.
Thank you again for all your help and to all who have responded.
Pat USA
Hi Pat! Inside these things is quite basic. If you, your hubby or your son-in-law have ever used a screwdriver and a soldering iron before, it should be a breeze. Also, if the machine is not working, what have you got to lose?! I’m sure you could do it. Good luck!
1 x 0.047uF 250V AC Mains, Metallised Polypropylene Capacitor X2.
1 x 0.1uF 250V AC Mains, Metallised Polypropylene Capacitor X2.
1 x 500mA M205 Quick Blow Fuse, 5mm round x 20mm long.
Hi Pam, depending on what country you are in, any electronics components shop (ones that sell the little resistors and switches and things) should stock them.